
What Will You Need?
Paper quilling strips – though you can cut your own, especially if working with younger papers
Craft paper – for gluing your Rangoli too
Slotted quilling tool – though a toothpick can work as well
Craft Glue
Scissors
Implementation
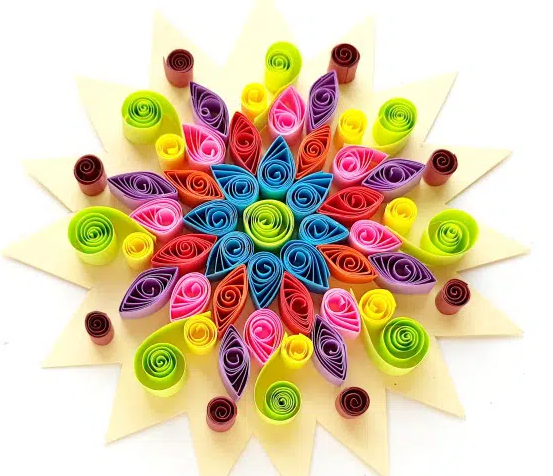
Step 1: Select a color for the center of the quilled rangoli pattern and take a long quilling strip. Use the slotted quilling tool to coil the whole strip tightly.
Step 2: Take the coil out of the tool and place it on a flat surface and allow it to loosen up freely.
Step 3: Select more strips for the next layer of the rangoli. I’m using blue colored strips.
Step 4: Quill some loose coils with the blue strips.
Step 5: Take a loose coil and press the coil on any one point to form a teardrop shape. Glue the open end to secure the shape.
Step 6: Similarly prepare the rest of the loose coils. Use different colored quilling strips to create more teardrop shapes.
Step 7: Use more strips to create different shapes. You can go for basic lens shape, tight coils, twirl shapes.
Step 8: Prepare a piece of paper (white or cream will be great!). Glue the first loose coil on the center of the paper.
Step 9: Grab teardrop (or lens) shapes for the next layer and glue them around the center shape.
Step 10: For the third layer glue the selected shapes in between the shapes of the previous layer.
Steps 11, 12, 13, 14: Continue to glue the prepared quilled shapes to create the quilled rangoli pattern. Make sure to keep the design and the color combination nice and sound.
Step 15: Once you’re satisfied with the quilled rangoli pattern, use scissors to cut a round zigzag border around the quilled design.
Credit: Original Source
Impact
Encourages EA & D, UW, C & L
Category
- Communication and Language
- Personal , Social and Emotional Development
- Physical Development
- Literacy
- Mathematics
- Understanding the World
- Expressive Arts and Design